学习和使用 Linux 过程中遇到的问题和解决办法
用户名所在行高亮显示

执行下面的脚本后重新登录即可
wget https://fastly.jsdelivr.net/gh/NineHolic/nineholic.github.io@master/_posts/files/shell/setcolor.sh && /bin/bash setcolor.sh
或者把以下内容添加对应用户到 .bashrc 中:
force_color_prompt=yes
if [ -n "$force_color_prompt" ]; then
    if [ -x /usr/bin/tput ] && tput setaf 1 >&/dev/null; then
	# We have color support; assume it's compliant with Ecma-48
	# (ISO/IEC-6429). (Lack of such support is extremely rare, and such
	# a case would tend to support setf rather than setaf.)
	color_prompt=yes
    else
	color_prompt=
    fi
fi

if [ "$color_prompt" = yes ]; then
    PS1='${debian_chroot:+($debian_chroot)}\[\033[01;32m\]\u@\h\[\033[00m\]:\[\033[01;34m\]\w\[\033[00m\]\$ '
else
    PS1='${debian_chroot:+($debian_chroot)}\u@\h:\w\$ '
fi
unset color_prompt force_color_prompt

# If this is an xterm set the title to user@host:dir
case "$TERM" in
xterm*|rxvt*)
    PS1="\[\e]0;${debian_chroot:+($debian_chroot)}\u@\h: \w\a\]$PS1"
    ;;
*)
    ;;
esac

# enable color support of ls and also add handy aliases
if [ -x /usr/bin/dircolors ]; then
    test -r ~/.dircolors && eval "$(dircolors -b ~/.dircolors)" || eval "$(dircolors -b)"
    alias ls='ls --color=auto'
    #alias dir='dir --color=auto'
    #alias vdir='vdir --color=auto'

    alias grep='grep --color=auto'
    alias fgrep='fgrep --color=auto'
    alias egrep='egrep --color=auto'
fi
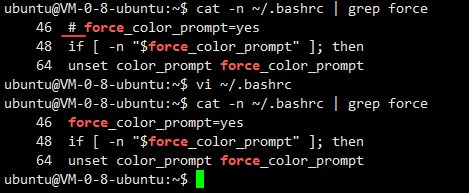
Ubuntu 下可直接修改对应用户目录下的 .bashrc 文件,把# force_color_prompt=yes注释去掉后重新登录
(如果使用其他用户登录,其下的 .bashrc 也要修改,与终端软件无关)
更换 yum 源
将本地 CentOS 的 yum 安装源更换为阿里源
# 备份本地 yum 源
mv /etc/yum.repos.d/* /etc/yum.repos.d.bak/

# 使用 curl 或 wget 命令下载阿里源文件
curl -o /etc/yum.repos.d/CentOS-Base.repo http://mirrors.aliyun.com/repo/Centos-7.repo
wget -O /etc/yum.repos.d/CentOS-Base.repo http://mirrors.aliyun.com/repo/Centos-7.repo

# 清理缓存
yum clean all

# 生成新的缓存
yum makecache

# 测试 yum
yum search openssh
更换 apt 源
清华开源镜像站:https://mirrors.tuna.tsinghua.edu.cn/help/ubuntu,选择ubuntu版本
# 默认注释了源码镜像以提高 apt update 速度,如有需要可自行取消注释 16.04 LTS
deb https://mirrors.tuna.tsinghua.edu.cn/ubuntu/ xenial main restricted universe multiverse
# deb-src https://mirrors.tuna.tsinghua.edu.cn/ubuntu/ xenial main restricted universe multiverse
deb https://mirrors.tuna.tsinghua.edu.cn/ubuntu/ xenial-updates main restricted universe multiverse
# deb-src https://mirrors.tuna.tsinghua.edu.cn/ubuntu/ xenial-updates main restricted universe multiverse
deb https://mirrors.tuna.tsinghua.edu.cn/ubuntu/ xenial-backports main restricted universe multiverse
# deb-src https://mirrors.tuna.tsinghua.edu.cn/ubuntu/ xenial-backports main restricted universe multiverse
deb https://mirrors.tuna.tsinghua.edu.cn/ubuntu/ xenial-security main restricted universe multiverse
# deb-src https://mirrors.tuna.tsinghua.edu.cn/ubuntu/ xenial-security main restricted universe multiverse

# 预发布软件源,不建议启用
# deb https://mirrors.tuna.tsinghua.edu.cn/ubuntu/ xenial-proposed main restricted universe multiverse
# deb-src https://mirrors.tuna.tsinghua.edu.cn/ubuntu/ xenial-proposed main restricted universe multiverse
# 备份本地源文件
cp /etc/apt/sources.list /etc/apt/sources.bak1

# 修改源文件,将清华源写入
vim /etc/apt/sources.list

# 更新软件源列表:访问源列表里的每个网址,并读取软件列表,然后保存在本地电脑
apt-get update

# 更新软件:更新本地已安装的软件,生产环境慎用
apt-get upgrade
查看 linux 版本
# 查看版本
cat /proc/version
uname -a

cat /etc/redhat-release

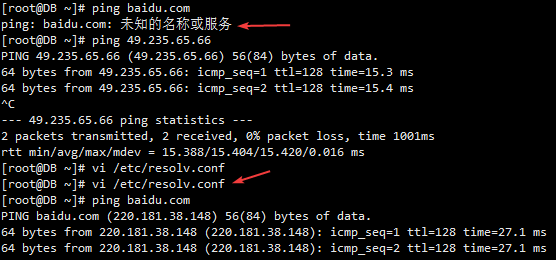
域名无法ping通
# 修改 /etc/reolv.conf,配置 dns,添加两行
nameserver 114.114.114.114
nameserver 223.5.5.5
修改主机名称
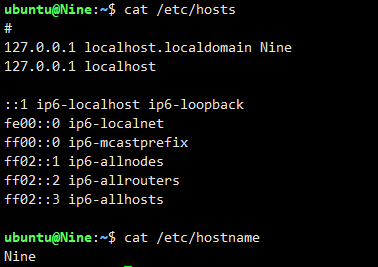
修改 etc 目录下的 hosts 文件和 hostname 文件后重启系统
修改 ssh 端口号
# 将默认的 22 端口改为 22333 端口
vim /etc/ssh/sshd_config

# 重启 ssh 服务
systemctl restart sshd
禁止 root 登录
此项修改需已有其它账号,否则会无法登录
# 将 PermitRootLogin 所在行注释去掉,yes 改为 no
vim /etc/ssh/sshd_config

# 重启 ssh,此时使用 root 账号连接会提示 ssh 服务器拒绝了密码,说明配置成功
systemctl restart sshd
删除自带的 openjdk
# 查看 openjdk 的路径
alternatives --config java

# ARM 架构位置
/usr/lib/jvm/java-1.8.0-openjdk-1.8.0.232.b09-0.el7_7.aarch64/jre/bin/java

# X86 架构位置
/usr/lib/jvm/java-1.7.0-openjdk-1.7.0.171-2.6.13.2.el7.x86_64/jre/bin/java

# 假删除(防止出现一些奇怪错误),解除 openjdk 的链接配置后自己的 jdk 就行
alternatives --remove java /usr/lib/jvm/java-1.8.0-openjdk-1.8.0.232.b09-0.el7_7.aarch64/jre/bin/java

# 真删除,使用 java -version 查看是否删除成功
rm -rf java-1.8.0-openjdk-1.8.0.232.b09-0.el7_7.aarch64
磁盘空间已满,但实际占用却很小
如下图情况,使用du -sh查看占用大小

使用lsof | grep deleted查看,没有lsof命令则使用yum安装:yum -y install lsof
可以看到java进程占用了大约49G空间,使用kill -9 35467杀掉进程释放空间


防火墙操作 firewall
# 开机启用/禁用
systemctl enable firewalld
systemctl disable firewalld

# 查看 firewall 服务状态
systemctl status firewalld

# 查看 firewall 的状态
firewall-cmd --state

# 服务命令
service firewalld start
service firewalld stop
service firewalld restart

# 查看防火墙规则
firewall-cmd --list-all

# 开放端口
firewall-cmd --permanent --zone=public --add-port=8080/tcp
firewall-cmd --permanent --zone=public --add-port=8080-9090/tcp

# 移除端口
firewall-cmd --permanent --zone=public --remove-port=80/tcp

# 对指定 ip 开放端口
firewall-cmd --permanent --add-rich-rule="rule family="ipv4" source address="192.168.0.105" port protocol="tcp" port="8859" accept"

# 删除某个IP
firewall-cmd --permanent --remove-rich-rule="rule family="ipv4" source address="192.168.1.51" accept"

# 针对一个ip段访问
firewall-cmd --permanent --add-rich-rule="rule family="ipv4" source address="192.168.1.0/24" port protocol="tcp" port="8859" accept"
firewall-cmd --permanent --add-rich-rule="rule family="ipv4" source address="192.168.0.0/16" accept"

# 端口转发
firewall-cmd --permanent --zone=public --add-forward-port=port=3336:proto=tcp:toport=3306:toaddr=192.168.0.105

# 查看转发的端口
firewall-cmd --list-forward-ports

# 更新防火墙规则(修改配置后需执行)
firewall-cmd --reload

# 参数解释
1、firwall-cmd:是 Linux 提供的操作 firewall 的一个工具;
2、--permanent:设置永久;
3、--zone=public:作用域
4、--add-port:标识添加的端口;
iptables 相关命令失效
原因是 Centos 7 开始默认使用 firewalle 管理防火墙

# 停止 firewalld 服务、禁止firewall开机启动
systemctl stop firewalld
systemctl disable firewalld.service

# 安装 iptables-services
yum -y install iptables-services

# 设置防火墙开机启动
systemctl enable iptables.service

# 服务命令
systemctl stop iptables
systemctl start iptables
systemctl restart iptables
systemctl reload iptables

# 查看 iptables 现有规则
iptables -L -n
替换为 unix 格式换行(将 \r 替换成空)
脚本运行时出现问题

原因:在 window 下编写脚本然后在上传到 Linux 上时,由于 window 上换行显示的为 \r\n,然而在 linux 上换行显示应该为 \n,所以在 Linux 下无法读取从 window 上传来的脚本,将 \r 替换成空即可( Mac 系统里,每行结尾是回车,即 \r )
chmod +x color.sh
sed -i 's/\r$//' color.sh
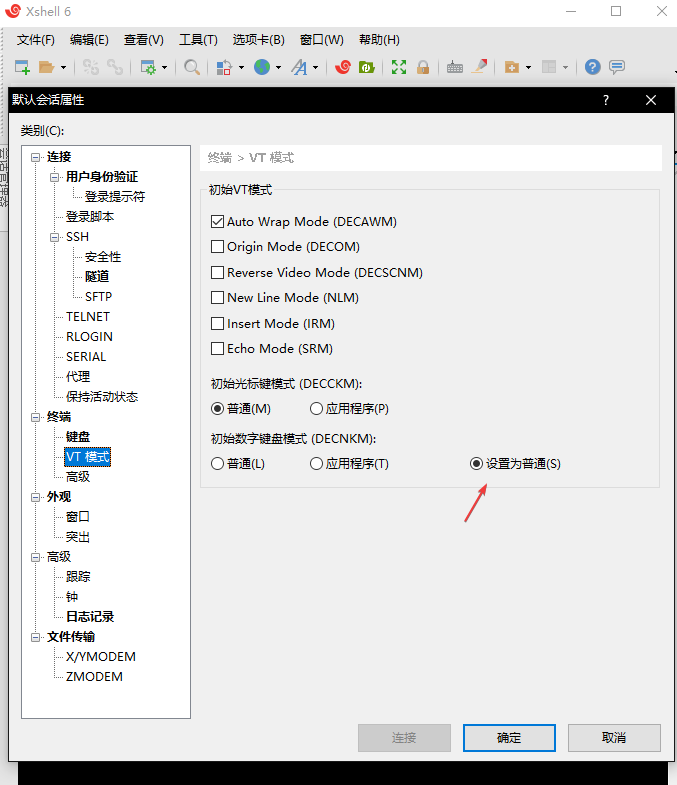
vi 编辑时启用数字小键盘
使用 vi 编辑文件时小键盘数字会变成字母,要恢复输入数字状态需要在 Xshell 中修改 VT 模式设为普通
为普通用户添加 sudo 权限
# root 用户下执行
chmod u+w /etc/sudoers

# 默认新建的用户不在 sudo 组
vi /etc/sudoers

# 添加一行,默认 5 分钟后刚才输入的 sodo 密码过期,下次 sudo 需要重新输入密码
centos ALL=(ALL) ALL

# 加上 NOPASSWD 可以不用每次输入密码
centos ALL=(ALL)NOPASSWD: ALL
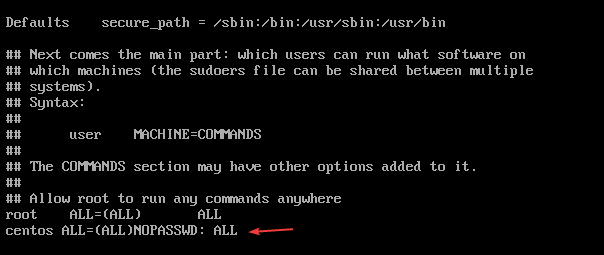
注意: 有的时候你的将用户设了 nopasswd,但是不起作用,原因是被后面的 group 的设置覆盖了,需要把 group的设置也改为 nopasswd
joe ALL=(ALL)NOPASSWD: ALL
%admin ALL=(ALL)NOPASSWD: ALL
获取目录下的文件名
# 显示目录下的文件名,带后缀
find /home/oracle/impdir/ -name '*.DMP' -exec basename {} \;

# 显示目录下的文件名,不带后缀
for file_name in `ls /home/oracle/impdir/*.DMP`;do basename $file_name .DMP;done

Centos 永久关闭蜂鸣器
虚拟机安装 centos 后出现蜂鸣声
# root用户下执行
echo “rmmod pcspkr” >>/etc/rc.d/rc.local

# 添加执行权限后重启
chmod +x /etc/rc.d/rc.local
- 本文作者:Nine
- 本文链接:https://nineholic.github.io/wiki/linux/
- 版权声明:自由转载-非商用-非衍生-保持署名(创意共享3.0许可证)